
P.S. I originally published this post last year, when I was just starting to learn Rails. Since then, I've learned a few more things and hence decided to revise, polish, and re-publish it. Also, a ton of new subscribers have joined the email list, and I thought you all might find it helpful.
You’ve been around in the Rails world for a while. You know your way around rails. But you keep hearing the word ‘Rack’ and don’t really understand what it is or what it does for you.
You try to read the documentation on the Rack Github repository or the Rails on Rack guides, but the only thing it does is add to the confusion. Everyone keeps saying that it provides a minimal, modular, and adaptable interface for building web applications. But what the heck does that really mean?
If there’s a list of topics that confuses most new Rails developers, Rack is definitely up there at the top. When I started learning Ruby and Rails last year, Rack took a really long time to wrap my head around. If you are in the same boat, fear not. In this article, I will try to explain pretty much everything that you need to know about Rack as a Ruby and Rails developer.
What You'll Learn:
- Making Ruby Talk to Web Servers with Rack
- The Rack Protocol
- The Rack Gem
- Middleware Toolbox
- Tools to Build Rack Apps and Middleware
- The
rackupCommand - The Rack DSL
It’s quite a long article, but if you stick to the end, you will have a much better understanding of Rack. We'll cover the Rack protocol, the Rack gem, the middleware toolbox, the Rack DSL, and much more. This is the day when you learned Rack.
Sounds good? Let's get started.
I strongly believe that to understand any solution, we first need to understand the problem. Hence, before we try to understand the theory behind Rack, let’s try to understand the basic problem it's trying to solve, by building a very simple web application in Ruby using different web servers, such as Puma, Thin, and Unicorn.
Making Ruby Code Talk to Web Servers
Let's build a simple web application in plain Ruby.
Create a new directory and add a file named config.ru. Don’t worry, it’s just a regular Ruby file with a different extension (it’s short for rackup, but let’s ignore that for now). All Rails apps have a config.ru file in the root directory.
mkdir web
cd web

touch config.ru
Now add the following code in this file, which creates the most basic web application you have seen. Don’t worry about the run method at the bottom for now. We will return to it later.
# config.ru

class App
   def call(env)
     headers = { 'Content-Type' => 'text/html' }

     response = ['<h1>Greetings from Rack!!</h1>']

     [200, headers, response]
   end
end

run App.new
This is our very own web application that returns a simple response. Now let’s try to run it in the browser. For that, we will need a web server, a piece of software that accepts HTTP requests and returns HTTP response.
I will use Puma, which is the web server that Ruby on Rails ships with.
Puma
Install and launch Puma using the following commands from the web directory:
➜ gem install puma

➜ puma
Puma starting in single mode...
* Puma version: 5.6.4 (ruby 3.1.0-p0) ("Birdie's Version")
*  Min threads: 0
*  Max threads: 5
*  Environment: development
*          PID: 32026
* Listening on http://0.0.0.0:9292
Use Ctrl-C to stop
By default, Puma looks for a config.ru file in the same directory, and uses that to launch our web application.
Now our server is up and running. Point your browser to http://localhost:9292 and you will see this:
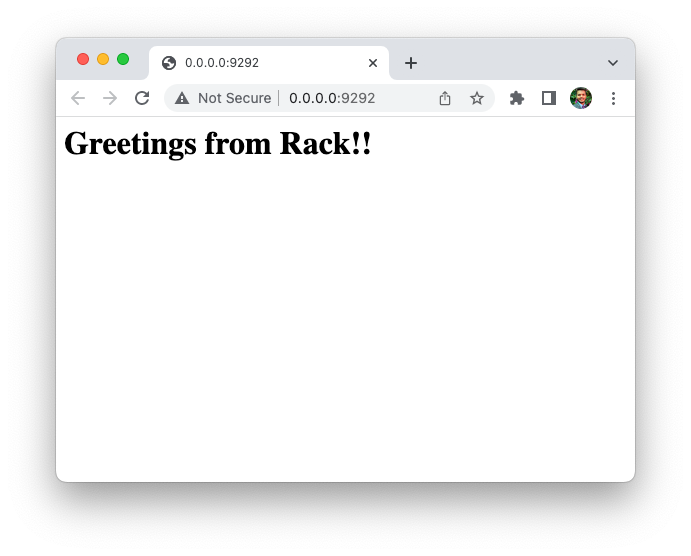
Stop the server using Ctrl + c command. At this point, we have a very simple web application up and running using the Puma web server.
Now let’s run this application using a different server. We’ll use Thin, a small, simple, and fast web server.
Thin
Install and launch the Thin web server using the following commands.
gem install thin
thin start
The Thin server is up and running and serving our application. Point your browser to http://localhost:3000 and you should see the same web page that we saw earlier.
Let’s try one last time to use a different web server. This time we’ll use Unicorn, an old web server that used to be popular in the Rails community.
Unicorn
Install and launch the Unicorn web server using the following commands.
gem install unicorn
unicorn
Point your browser to http://localhost:8080. Again, you should see the same web page.
What's the Point?
A few questions you might have right now:
- How did all of these web servers know how to run our application?
- Why didn’t we have to change even a single line in our application to make it work with a different server?
The answer is that our application follows the Rack protocol, and they all are rack-compliant web servers.
Okay, but what does that mean?
It means, when started, all web servers looked for an application (Ruby class or object) that satisfied the following three conditions:
- It has a
callmethod. - It accepts the
envobject representing the HTTP request (don't worry, it's just a Ruby Hash). - It returns an array containing three values: the status code, the headers, and the response.
class App
   def call(env)
     headers = { 'Content-Type' => 'text/html' }

     response = ['<h1>Greetings from Rack!!</h1>']

     [200, headers, response]
   end
end
This is what everyone means when they say “Rack provides a minimal, modular, and adaptable interface.” You can use any class or object that satisfies the above three conditions with any web server, and everything will still work as expected.
Every rack compliant webserver will always invoke a call method on an object (the Rack application) and serve the result of that method.If you're curious how it works in Rails, here's the config.ru file in your Rails app:
# This file is used by Rack-based servers to start the application.

require_relative "config/environment"

run Rails.application
Rails.application.load_server
The Rails.application has a call method defined in the Rails::Engine class, the superclass of Rails::Application.
module Rails
  class Engine < Railtie

    # Define the Rack API for this engine.
    def call(env)
      req = build_request env
      app.call req.env
    end
  end
end
In a future post, we'll learn how Rails handles incoming requests (it's fascinating), but let's continue learning Rack for now.
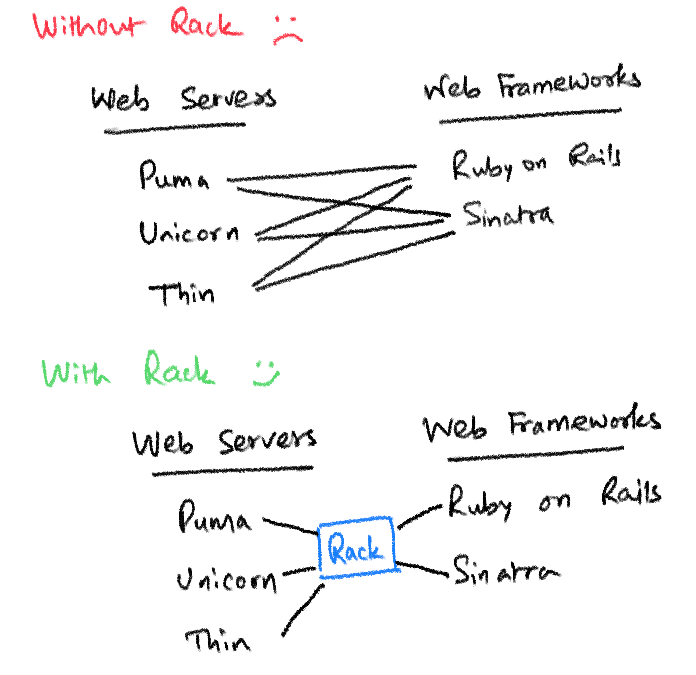
So far, we've seen how the same Ruby application works with multiple servers. However, the other way works, too. You can replace our simple application with another script, a Rails application, or even a Sinatra application, and any Rack-compliant web server can run it without a problem.
Rack allows application frameworks & web servers to communicate with each other, and replace each without changing the other.
This is Rack’s main benefit.
Rack provides a common protocol (or interface, or specification) that different web servers can use to talk to different web applications, without worrying about the internals of each.
The Problem: Before Rack came along, each framework had to understand each other web server’s API to communicate with it.
The Solution: With Rack, the creators of web servers and web frameworks all agreed to talk to each other using a standardized way to reduce the efforts involved with communicating with different standards.
If you are building the next high-performant web server or application framework, you can talk with any other rack-compliant web application or web server as long as you follow the Rack specification.
This is pretty useful. Now let’s learn some theory.
The Rack Protocol
Here’s the standard definition of Rack that you have heard.
Rack provides a minimal, modular, and adaptable interface for developing web applications in Ruby.
At the very basic level, Rack is a protocol, just like HTTP. Rack provides a layer between the framework (Rails) & the web server (Puma), allowing them to communicate with each other.
The Rack protocol allows you to wrap HTTP requests and responses in simple interfaces. This simplifies the API for web servers and frameworks into a single method call.
This is exactly similar to how your browser talks to the web server using the HTTP protocol. That allows any client (Chrome, Firefox, or even terminal commands) to talk to any backend server written in any language (PHP, .NET, Ruby, etc.) so you can access the website.
When we say an application is Rack-compliant, it means the following:
- It has a
callmethod that accepts a single argumentenv, containing all the data about the request, and - It returns an array containing:
- The status code, e.g. 200 for success
- A hash containing the headers, and
- An array containing a single string, which is the response body.
The Rack Gem
So far, we’ve only talked about the Rack specification. But there’s also a gem called Rack. You can find the source code for it on Github, read the documentation on Rubydoc, and install it like any other Ruby gem.
gem install rack
Why do we need the Rack gem if the rack-compliant web servers and frameworks can communicate without it?
Here are a few important reasons.
1. Middleware Toolbox
Because the Rack interface is so simple, you can use any code that implements this interface in a Rack application.
This allows you to build small, focused, and reusable applications which work together to provide different functionalities. These mini-components are known as Middleware.
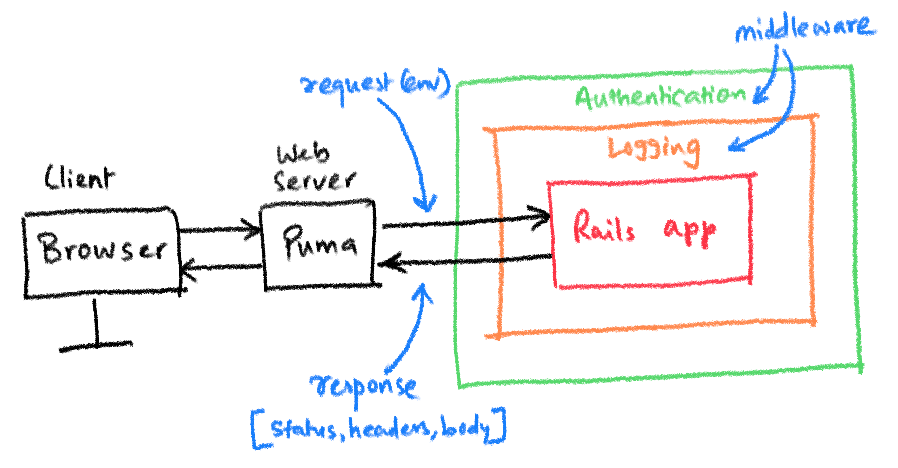
Middleware sits between the user and the application code. When an HTTP request comes in, the middleware can intercept, examine, and modify it. Similarly, it can examine and modify the HTTP response before forwarding it to the user.
Middleware is very useful for writing logic that is not specific to your web application, such as authenticating the request, logging, or exception handling. It focuses on doing one thing and doing it well.
Using middleware also simplifies your application code, and it can only focus on the logic related to the application.
For example, here’s a middleware that logs to the console
- before it passes the request to the next application in the pipeline and
- after it receives the response on its way out.
class Logger
  def initialize(app)
    @app = app
  end

  def call(env)
    puts "Received the incoming request"

    # forward the request to the next middleware or app
    status, headers, body = @app.call(env)

    puts "Received the outgoing response"

    [status, headers, body]
  end
end
- This middleware accepts the
appin the constructor. Theappcan be another middleware in the pipeline or the actual application. - When called, it first deals with the incoming request represented by the
envobject. Here, we print “Received the incoming request”. - After handling the request, it passes the request to the next middleware (or app) in the pipeline,
- Upon receiving the response (
status, headers, body) from the next middleware (@app), it logs to the console. - Finally, it passes the response to the next middleware in the pipeline. This can be the middleware that called our logging middleware or the web server.
Here’s a diagram that will help you visualize the middleware pipeline.

The Rack gem provides many such components that you can use. All these components use the same Rack interface.
Here are some middleware components included in the Rack gem.
Rack::Files, for serving static files.Rack::Config, for modifying the environment before processing the request.Rack::ContentLength, for setting content-length header based on body size.Rack::ContentType, for setting default content-type header for responses.Rack::Deflater, for compressing responses with gzip.Rack::Head, for returning an empty body for HEAD requests.Rack::Logger, for setting a logger to handle logging errors.Rack::Reloader, for reloading files if they have been modified.Rack::ShowException, for catching unhandled exceptions and presenting them in a nice and helpful way with clickable ‘backtrace.Rack::ShowStatus, for using nice error pages for empty client error responses.
You can find a complete list here. Pick and choose whatever you like, in any way you wish.
2. Tools to Build Rack Applications and Middleware
The Rack gem provides the infrastructure code that you can use to build your own web application, web framework, or middleware. It allows to quickly prototype or build stuff without doing the same repetitive tasks again and again.
Here are some helpers you can use with Rack:
Rack::Request, which also provides query string parsing and multipart handling.Rack::Response, for convenient generation of HTTP replies and cookie handling.Rack::MockRequestandRack::MockResponsefor efficient and quick testing of Rack application without real HTTP round-trips.Rack::Cascade, for trying additional Rack applications if an application returns anot found (404)ormethod not supported (405)response.Rack::Directory, for serving files under a given directory, with directory indexes.Rack::MediaType, for parsing content-type headers.Rack::Mime, for determining content-type based on file extension.
Since the Rack interface is so simple, anyone can build and publish useful middleware, and the community did build many such components.
The rack-contrib project on Github contains a library of these middleware components. Take a look; you will definitely find something useful.
3. The rackup command
The Rack gem ships with the rackup command (update: as of Rack 3, the rackup command has been moved to a separate rackup gem. See this pull-request and related discussion). It is a useful tool for running Rack applications with a web server. It uses the Rack::Builder DSL (domain-specific language) to configure middleware and easily compose applications.
The rackup command automatically figures out the environment it is run in, and runs your application as WEBrick, Puma, or any web server—all from the same configuration.
Let’s try that now.
So far, we’ve been launching our web application using a web server-specific command, i.e. puma, thin start, or unicorn. Using rackup lets us be web server agnostic. In the same directory containing your config.ru file, run rackup command:
➜ gem install rackup
➜ rackup

Puma starting in single mode...
* Puma version: 5.6.4 (ruby 2.7.1-p83) ("Birdie's Version")
*  Min threads: 0
*  Max threads: 5
*  Environment: development
*          PID: 28318
* Listening on http://127.0.0.1:9292
* Listening on http://[::1]:9292
Use Ctrl-C to stop
Since I have Puma installed, it launched the application in Puma. If you have some other web server, rackup will use it.
4. Convenient DSL
If you aren’t familiar with the term DSL, it stands for Domain Specific Language. It is a programming language with a higher level of abstraction optimized for a specific class of problems.
A DSL uses the concepts and rules from the field or domain. For example, Ruby on Rails provides a DSL for building web applications.
Rack provides such a DSL consisting of the following methods:
run: It takes a Ruby object responding to the call method as an argument and invokes the call method on it. We used this method in our example at the beginning of this post.map: It takes a string and a block as parameters and maps incoming requests against the string. If it matches, Rack will run the block to handle that request. This is similar to how routing works in Rails.use: It includes the middleware to the rack application.
Additionally, the Rack::Builder class helps you with iteratively composing Rack applications.
Let’s use all these tools to build another web application. First, replace the code in the config.ru file with the following:
# config.ru

require_relative './app'

app = Rack::Builder.new do
  use Rack::ShowExceptions
  use Rack::Logger

  map "/welcome" do
    use Rack::Lint
    run App.new
  end
end

run app
This DSL tells Rack to use the Rack::ShowExceptions and Rack::Logger middleware before using our App.
Finally, add a new file app.rb in the same directory with the following code:
# app.rb

class App
  def call(env)
    headers = { 'Content-Type' => 'text/html' }

    response = ['<h1>Greetings from Rack!!</h1>']

    [200, headers, response]
  end
end
Now, run the rackup command, and navigate to /welcome page on the server. You should be greeted with the response from our application.
When a request comes from the web server, Rack will first use the exception-handling middleware, then the logging middleware, and finally run the app.
The app will process the incoming request, and return the response, which will again be examined and processed by the middleware stack, this time in the reverse sequence.
To summarize what we’ve learned so far, the Rack protocol powers the web in the Ruby world. It consists of two things:
- The Rack specification (protocol) provides a simple interface that allows web servers and applications to talk to each other.
- The Rack gem provides middleware, tools, and DSL that let us iteratively compose our Rack-compliant applications.
Additionally, Rack middleware components allow you to separate the application logic from peripheral concerns like authentication, logging, and error handling. You can use any middleware built by the community for everyday use cases.
That’s it. If you're still reading this, you should have a much better understanding of Rack and the surrounding ecosystem. I hope you liked this article and you learned something new. I sure did.
If you have any questions or feedback, didn't understand something, or found a mistake, please leave a comment below or send me an email. I look forward to hearing from you.
Please subscribe to my blog if you'd like to receive future articles directly in your email. If you're already a subscriber, thank you.
If you liked this post, you might also enjoy these articles: